Jak zainstalować widżet dostępności w WordPress

Instalacja wtyczki
Krok 1: Instalacja wtyczki
Wtyczkę można łatwo zainstalować za pomocą repozytorium wtyczek WordPress.
W panelu administracyjnym WordPress, przejdź do zakładki „Wtyczki” w lewym menu, a następnie kliknij „Dodaj nową” u góry strony.
W polu wyszukiwania wpisz „Assist For WCAG”, a po znalezieniu wtyczki, kliknij „Zainstaluj”, a następnie „Włącz”.
Po aktywacji, w menu po lewej stronie, przewiń w dół i wybierz „Dostępność”.
Krok 2: Rejestracja witryny i uzyskanie tokenu
Jeżeli instalujesz wtyczkę po raz pierwszy, zarejestruj się za pomocą Google, Facebooka lub użyj własnego adresu e-mail i hasła. Po założeniu konta przejdź do zakładki "Moje strony", a następnie kliknij przycisk "Dodaj nową".
 W formularzu dodawania nowego strony podaj adresy stron internetowych, na których chcesz zastosować token. Jeśli twoja strona działa na domenie np. example.com i np. www.example.com to konieczne jest dodanie obu adresów. Więcej na ten temat w dokumentacji.
Na koniec kliknij przycisk "Zapisz" i skopiuj wygenerowany token.
W formularzu dodawania nowego strony podaj adresy stron internetowych, na których chcesz zastosować token. Jeśli twoja strona działa na domenie np. example.com i np. www.example.com to konieczne jest dodanie obu adresów. Więcej na ten temat w dokumentacji.
Na koniec kliknij przycisk "Zapisz" i skopiuj wygenerowany token.

Krok 3: Aktywacja widżetu dostępności
Po uzyskaniu tokenu, wróć do panelu WordPress, przejdź do sekcji konfiguracji wtyczki Assist For WCAG i wprowadź skopiowany token w odpowiednie pole oraz zapisz zmiany.
Krok 4: Podgląd witryny
Po zakończeniu instalacji i konfiguracji, przetestuj widżet na swojej stronie, aby upewnić się, że działa prawidłowo i jest zgodny z wymaganiami WCAG.
Ręczna instalacja widżetu dostępności na stronie internetowej WordPress
Jeśli wolisz ręcznie zainstalować widżet DockWCAG na swojej stronie internetowej, postępuj zgodnie z poniższymi krokami:
Krok 1: Rejestracja witryny i uzyskanie tokenu
Jeżeli instalujesz wtyczkę po raz pierwszy, zarejestruj się za pomocą Google, Facebooka lub użyj własnego adresu e-mail i hasła.
Po założeniu konta przejdź do zakładki "Moje strony", a następnie kliknij przycisk "Dodaj nową".
W formularzu dodawania nowego strony podaj adresy stron internetowych, na których chcesz zastosować token. Jeśli twoja strona działa na domenie np. example.com i np. www.example.com to konieczne jest dodanie obu adresów. Więcej na ten temat w dokumentacji.
Na koniec kliknij przycisk "Zapisz" i skopiuj wygenerowany token.
Krok 2: Osadzenie kodu w WordPress
Aby zainstalować widżet, musisz dodać odpowiedni skrypt do kodu HTML swojej witryny. Pamiętaj, aby nie usuwać żadnych elementów z istniejącego kodu, ponieważ mogłoby to wpłynąć na działanie strony.
Skopiuj poniższy kod:
<script>
    (function (d, s, t) {
        var f = d.getElementsByTagName(s)[0],
            j = d.createElement(s);
        j.async = true;
        j.src = '//wcag.dock.codes/accessibility/' + t + '/start.js';
        f.parentNode.insertBefore(j, f);
    })(document, 'script', '_TOKEN_');
</script>
Więcej na temat konfiguracji widgetu znajdziesz dokumentacji.
Przejdź do zakładki „Wygląd” w lewym menu panelu administracyjnego WordPress, a następnie wybierz „Edytor plików motywu”.
W sekcji „Pliki motywu”, znajdź plik „header.php”.
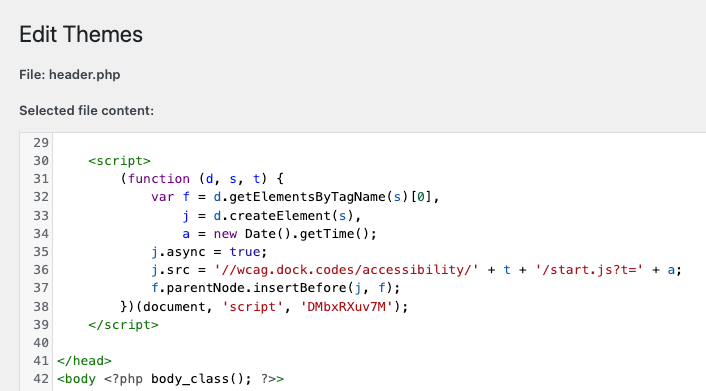
Wstaw skrypt tuż przed zamykającym tagiem </head>. Wklej kod i zastąp _TOKEN_ swoim unikalnym tokenem, który został wygenerowany w poprzednim kroku. Na koniec kliknij „Aktualizuj plik”.
Krok 3: Podgląd witryny
Po dodaniu skryptu, przetestuj swoją stronę, aby upewnić się, że widżet jest prawidłowo zainstalowany i działa zgodnie z oczekiwaniami. Sprawdź wszystkie funkcje widżetu, aby zweryfikować, że instalacja przebiegła pomyślnie.